dental assistant exam questions and answers pdf

Dental Assistant Exam Questions and Answers PDF: A Comprehensive Study Plan

Prepare effectively with a comprehensive review, utilizing over 3,000 multiple-choice questions modeled after the CDA exam, alongside detailed answer explanations for optimal success.

I. Understanding the CDA Exam

Navigating the Certified Dental Assistant (CDA) exam requires a strategic approach, and understanding its structure is paramount. The exam, administered by the Dental Assisting National Board (DANB), assesses competency across various dental assisting domains. Resources like Trivium Test Prep’s review guide offer a focused, yet comprehensive, preparation path.

Effective study involves utilizing practice questions – over 3,000 are available through resources like Evolve – mirroring the CDA’s multiple-choice format. These questions, complete with rationales, help identify knowledge gaps. The Child Dental Benefits Schedule (CDBS) also plays a role, as understanding dental benefits is crucial. Preparation should align with the Australian Dental Association’s standards, ensuring a thorough grasp of the material. Success hinges on dedicated practice and a clear understanding of exam expectations.

Maximize your preparation with focused study guides, practice tests featuring 3,000+ questions, and detailed explanations to confidently tackle the CDA exam.

The Certified Dental Assistant (CDA) exam is a crucial step towards a thriving career. Thorough preparation is key, and utilizing comprehensive study resources is paramount to success. Many candidates benefit from dedicated PDF study guides containing a wealth of practice questions.

These resources often mirror the format and content of the actual CDA examination, offering invaluable experience. Specifically, look for materials boasting over 3,000 multiple-choice questions, complete with detailed rationales explaining both correct and incorrect answers. This approach facilitates a deeper understanding of the underlying concepts.

Understanding the exam’s structure and content outline, as well as leveraging practice tests, will significantly boost your confidence and improve your chances of achieving a passing score. Remember to focus on areas where you identify weaknesses through test analysis.

II. Exam Content Outline

The CDA exam comprehensively assesses a dental assistant’s knowledge across several core areas. Preparation materials, including PDF study guides, should align with this structure. Key content includes core dental sciences – anatomy, physiology, pathology, and dental materials.

Clinical procedures, such as chairside assisting, infection control, and sterilization techniques, are heavily emphasized. Radiography and imaging principles, including interpretation and radiation safety, also form a significant portion of the exam.

Furthermore, a strong understanding of dental practice management – patient records, scheduling, and billing (CDBS) – is essential. Finally, knowledge of pharmacology, emergency procedures, and basic life support (BLS) is critical. Effective study resources will cover all these domains with ample practice questions.

III. Utilizing PDF Study Guides

PDF study guides offer a flexible and accessible method for exam preparation. Look for resources containing a substantial number of multiple-choice questions, mirroring the CDA exam format. These guides should provide detailed rationales for both correct and incorrect answers, fostering deeper understanding.

Prioritize materials that cover the complete exam content outline – dental sciences, clinical procedures, radiography, practice management, and emergency protocols. Supplement PDF study with practice tests, ideally including full-length simulations.

Evolve resources offer over 3,000 questions, enhancing your preparation. Regularly analyze practice test results to pinpoint weak areas and focus your study efforts accordingly.

II. Core Dental Sciences

Master essential dental sciences – anatomy, physiology, pathology, and materials – foundational for the CDA exam, ensuring a strong understanding of dental principles.

IV. Anatomy & Terminology

A solid grasp of anatomical structures is paramount for dental assistants, and comprehensive study materials will focus on the oral cavity, teeth, and surrounding tissues. Expect detailed questions on tooth morphology, including enamel, dentin, and pulp, as well as the identification of various anatomical landmarks.

Mastering dental terminology is equally crucial; understanding prefixes, suffixes, and root words will unlock the meaning of complex medical terms encountered in patient charts and during procedures. Practice quizzes and flashcards are invaluable tools for memorizing these terms.

Effective study resources will include labeled diagrams, interactive exercises, and practice questions designed to reinforce your knowledge of both anatomy and terminology, preparing you for the CDA exam’s challenges.

V. Physiology & Pathology

Understanding normal physiological processes within the oral cavity is fundamental. Study materials should cover salivary gland function, temporomandibular joint (TMJ) mechanics, and the process of mastication. Expect questions assessing your knowledge of how these systems operate in a healthy state.

Pathology focuses on disease processes. Prepare to identify common oral pathologies like caries, gingivitis, periodontitis, and oral cancer. Questions will likely involve recognizing signs, symptoms, and potential complications.

Comprehensive resources will present case studies and clinical scenarios, allowing you to apply your knowledge of physiology and pathology to real-world situations, ultimately boosting your confidence on the CDA exam.

VI. Dental Materials

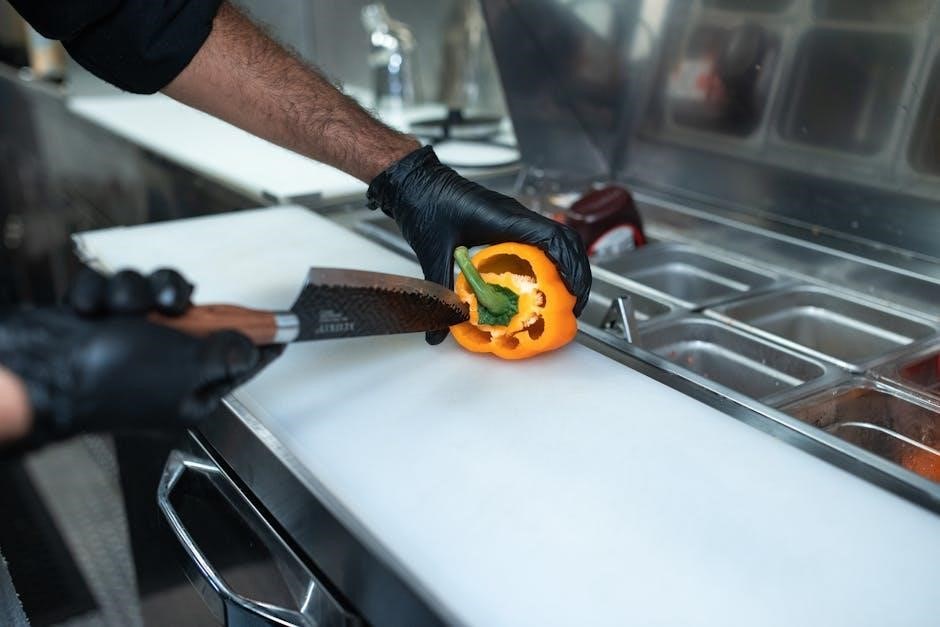
Mastering dental materials is crucial. Study guides should detail the composition, properties, and uses of various materials – amalgams, composites, ceramics, and impression materials are key. Understand their strengths, weaknesses, and appropriate applications in different clinical scenarios.

Expect questions on material manipulation, including mixing ratios, setting times, and potential adverse reactions. Knowledge of biocompatibility and infection control related to materials is also vital.

Effective preparation involves recognizing material failures and understanding how to properly handle and dispose of dental materials, ensuring patient safety and procedural success on the CDA examination.

III. Clinical Procedures

Focus on chairside assisting, infection control, and sterilization techniques, as these are heavily emphasized on the CDA exam, ensuring procedural proficiency.

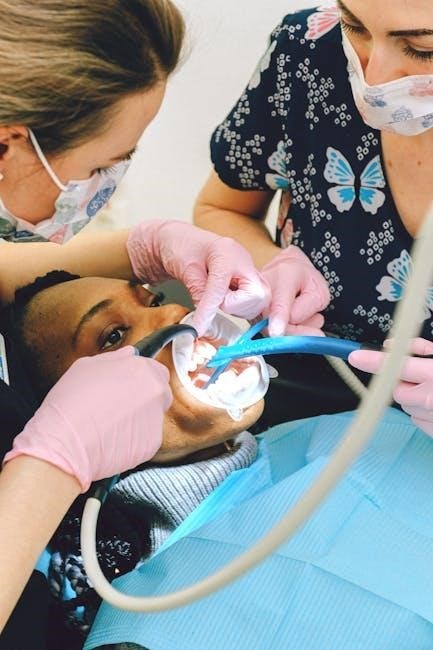
VII. Chairside Assisting

Mastering chairside assisting is crucial for the CDA exam, demanding a thorough understanding of dental procedures and assisting techniques. Expect questions covering instrument transfer, suctioning, retraction, and preparing materials.

Effective communication with the dentist and patient is paramount, alongside maintaining a sterile field. Practice questions will assess your knowledge of four-handed dentistry principles and anticipating the dentist’s needs.

Review proper patient positioning, understanding dental charting, and accurately recording treatment information. Preparation is key; utilize practice tests with 3,000+ questions to solidify your skills and confidently navigate the clinical aspects of the CDA examination.

VIII. Infection Control Protocols

Infection control is paramount in dentistry, and the CDA exam heavily emphasizes this area. Expect detailed questions on sterilization techniques, disinfection procedures, and barrier methods.

Understand the principles of asepsis, proper handling of contaminated instruments, and the use of personal protective equipment (PPE). Questions will assess your knowledge of OSHA guidelines and CDC recommendations.

Familiarize yourself with different types of sterilization – autoclave, chemical sterilization – and their monitoring procedures. Comprehensive study is vital; utilize practice questions, potentially from resources offering 3,000+ questions, to ensure you’re prepared to demonstrate a strong grasp of infection control protocols.

IX. Sterilization Techniques

Mastering sterilization is crucial for CDA exam success. Expect questions detailing autoclave operation, biological and chemical indicator monitoring, and proper instrument packaging.

Understand the differences between sterilization, disinfection, and sanitation, and when each is appropriate. The exam will test your knowledge of spore testing and the importance of maintaining accurate sterilization records.

Resources with extensive practice questions – like those offering over 3,000 – can help solidify your understanding. Thorough preparation is key; focus on the principles of steam sterilization and the proper procedures for handling contaminated instruments to confidently answer exam questions.

IV. Radiography & Imaging

Ace the radiography section by studying principles, image interpretation, and radiation safety protocols, utilizing practice questions for comprehensive CDA exam preparation.

X. Dental Radiography Principles

Mastering dental radiography principles is crucial for CDA exam success. This section focuses on understanding the fundamental concepts behind image formation, including X-ray production, beam collimation, and patient positioning.

Key areas of study include the properties of radiation, the inverse square law, and factors influencing image quality – such as kilovoltage peak (kVp), milliamperage (mA), and exposure time.

Furthermore, comprehending different radiographic techniques like bitewing, periapical, and panoramic imaging is essential.

Practice questions will assess your knowledge of these principles, ensuring you can confidently apply them in clinical scenarios and accurately answer exam questions related to radiographic techniques and safety.

XI. Image Interpretation

Developing strong image interpretation skills is vital for a dental assistant. This section focuses on recognizing normal anatomical structures and identifying common pathological conditions visible on dental radiographs.

You’ll learn to differentiate between various types of caries, periodontal disease indicators, and abnormalities of the jawbone. Understanding radiographic density and how different tissues appear on images is key.

Practice questions will present various radiographic images, challenging you to accurately identify features and diagnose potential issues.

This skill is essential for assisting the dentist during diagnosis and treatment planning, and will be thoroughly tested on the CDA exam.

XII. Radiation Safety

Prioritizing patient and operator safety regarding radiation exposure is paramount in dentistry. This section comprehensively covers radiation safety principles and protocols, crucial for the CDA exam.

You’ll delve into ALARA (As Low As Reasonably Achievable) principles, understanding how to minimize exposure through proper technique, shielding, and filtration. Knowledge of federal and state regulations concerning radiation safety is essential.

Practice questions will assess your understanding of radiation units, biological effects of radiation, and the use of personal protective equipment (PPE).

Mastering these concepts ensures responsible radiographic practice and demonstrates competency to the DANB.

V. Dental Practice Management

Efficient practice operations are key! Study patient records, scheduling, billing (CDBS), and coding procedures to excel on the CDA exam and beyond.

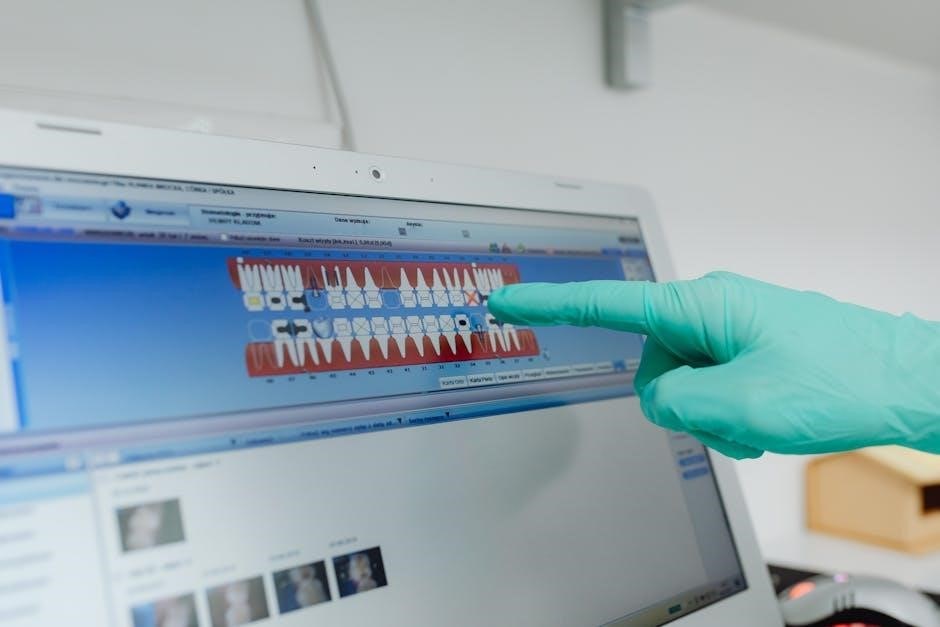
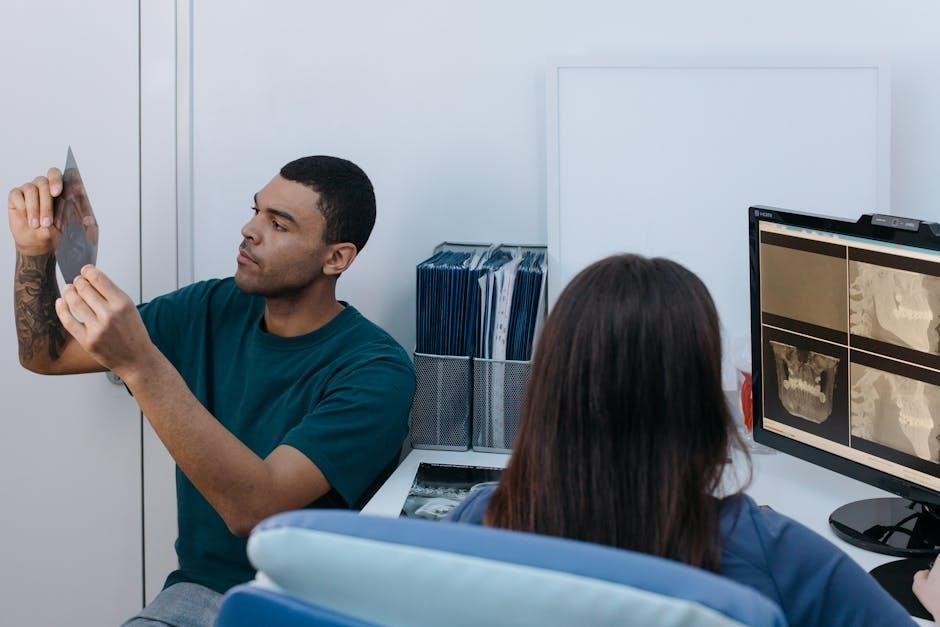
XIII. Patient Records Management

Mastering patient records is crucial for the CDA exam and daily practice. Thorough understanding of documentation, including accurate charting, medical and dental histories, and informed consent forms, is essential.

Dental assistants must know how to maintain confidentiality, adhering to HIPAA regulations, and ensure records are easily accessible yet securely stored.

Expect exam questions covering legal requirements for record retention, proper procedures for correcting errors, and the importance of complete and organized documentation.

Practice questions will likely assess your knowledge of electronic health records (EHR) and their impact on patient care and practice efficiency.

Preparation resources, like practice tests, offer valuable exposure to the types of scenarios you’ll encounter on the CDA exam regarding patient record integrity.

XIV. Scheduling & Appointment Procedures

Efficient scheduling is vital for a successful dental practice, and a key component of the CDA exam. Understanding appointment types – recall, new patient, emergency – and their appropriate time allocations is essential.

Expect questions on managing appointment books, prioritizing patient needs, and handling cancellations or rescheduling requests professionally. Knowledge of blocking out time for specific procedures is also important.

The exam will likely assess your understanding of patient communication regarding appointments, including confirmation calls and pre-appointment instructions.

Practice questions will test your ability to optimize scheduling to maximize productivity while minimizing patient wait times.

Review resources often include scenarios requiring you to apply scheduling principles to real-world dental office situations.

XV. Dental Billing & Coding (CDBS)

Mastering dental billing and coding, particularly the Child Dental Benefits Schedule (CDBS), is crucial for the CDA exam. The CDBS, an Australian Government program, provides dental benefits to eligible children.

Expect questions regarding benefit caps, eligible services, and the two-digit prefix used for CDBS dental items, based on the Australian Dental Association Schedule of Dental Services.

Understanding claim submission processes and accurate coding using the appropriate dental codes is essential.

Practice questions will assess your ability to verify patient eligibility and apply CDBS benefits correctly.

Resources emphasize staying updated on CDBS changes and ensuring compliance with program guidelines for accurate billing practices.

VI. Pharmacology & Emergency Procedures

Prepare for questions on common dental medications, managing medical emergencies, and performing Basic Life Support (BLS) within a dental office setting.

XVI. Common Dental Medications

Mastering pharmacology is crucial for the CDA exam. Expect questions covering frequently prescribed dental medications, including analgesics for pain management – like NSAIDs and opioids – and antibiotics used to combat oral infections.

Understand the purpose, dosage forms, and potential adverse effects of local anesthetics, vital for comfortable dental procedures. Be prepared to identify medications used for anxiety reduction, such as nitrous oxide, and their appropriate administration.

Furthermore, familiarize yourself with emergency medications like epinephrine for anaphylaxis and calcium gluconate for hydrofluoric acid exposure. Knowing drug interactions and contraindications is also essential for safe patient care and successful exam performance.

XVII. Medical Emergencies in the Dental Office

Preparedness is key when facing medical emergencies. The CDA exam will assess your knowledge of recognizing and responding to situations like syncope (fainting), allergic reactions – including anaphylaxis – and cardiac events.

Understand the protocols for managing diabetic emergencies, such as hypoglycemia and hyperglycemia, and the appropriate steps to take. Be familiar with seizure management and asthma exacerbations, including oxygen administration.

Knowing how to utilize emergency equipment, like oxygen tanks and AEDs, is vital. Practice scenarios involving choking and airway obstruction will also be tested. Prioritizing patient assessment, activating emergency medical services, and providing basic life support are crucial skills.

XVIII. Basic Life Support (BLS)

Mastering BLS is fundamental for any dental assistant. The CDA exam heavily emphasizes your ability to respond effectively to life-threatening emergencies. This includes performing high-quality CPR – cardiopulmonary resuscitation – for adults, children, and infants, adhering to current guidelines.

You’ll need to demonstrate proficiency in recognizing the signs of cardiac arrest and initiating the appropriate response. Understanding the steps for relieving choking, utilizing an automated external defibrillator (AED), and providing rescue breaths are essential.

Knowledge of the BLS algorithms and the importance of teamwork during a crisis will be assessed. Regular refresher courses are recommended to maintain competency and confidence in these critical skills.

VII. Practice Exams & Question Types

Sharpen your skills with practice tests featuring multiple-choice questions, mirroring the CDA exam format, and analyze results to pinpoint areas needing focused study.

XIX. Multiple-Choice Question Strategies

Mastering multiple-choice questions is crucial for CDA exam success. Begin by carefully reading each question and identifying key terms. Eliminate obviously incorrect answers, narrowing down your choices. Pay attention to wording – qualifiers like “always” or “never” often indicate incorrect options.

Understand the rationale behind correct answers, not just memorizing them. Utilize the process of elimination strategically, even if unsure. Time management is key; don’t spend too long on any single question.

Practice with a variety of questions, like those found in review guides and online resources (Evolve offers 3,000+). Reviewing answer explanations is vital for understanding concepts and improving future performance. Remember, a systematic approach and consistent practice will significantly boost your confidence and score.

XX. Analyzing Practice Test Results

Thorough analysis of practice test results is paramount for targeted study. Don’t just check your score; identify specific areas of weakness. Categorize missed questions by subject matter – anatomy, radiography, or infection control, for example.

Review the rationales for both correct and incorrect answers to deepen understanding. Utilize resources like DANB official materials and Evolve practice questions to reinforce challenging concepts.

Track your progress over multiple practice tests to monitor improvement. Focus your study efforts on consistently problematic areas. A detailed review, coupled with focused practice, will maximize your learning and prepare you for the CDA exam’s challenges.

XXI. Identifying Weak Areas

Pinpointing knowledge gaps is crucial for efficient studying. After analyzing practice tests, create a list of topics where performance consistently lags. Are you struggling with dental materials, pharmacology, or perhaps radiographic interpretation?

Refer back to the exam content outline to ensure comprehensive coverage. Utilize resources like the DANB official materials and the extensive Evolve question bank (3,000+ questions) to target these weak areas.

Don’t hesitate to revisit foundational concepts. Focused study, combined with consistent practice, will transform weaknesses into strengths, ultimately boosting your confidence and exam readiness.

VIII. Resources & Study Materials

Access vital tools like DANB resources, Evolve’s 3,000+ practice questions, and updates on the Child Dental Benefits Schedule (CDBS) for thorough preparation.

XXII. DANB Official Resources

The Dental Assisting National Board (DANB) provides essential resources for exam candidates. Their official website is the primary source for accurate information regarding the Certified Dental Assistant (CDA) examination, including eligibility requirements, exam content outlines, and registration procedures.

Candidates can find practice tests and study materials directly from DANB, designed to mirror the actual exam format and difficulty. These resources are invaluable for familiarizing yourself with the question types and assessing your knowledge gaps. Furthermore, DANB offers detailed information about the exam scoring process and certification maintenance requirements.

Exploring the DANB website ensures you have the most up-to-date information and access to legitimate study aids, maximizing your chances of success on the CDA exam. Utilizing these official resources is a cornerstone of effective exam preparation.

XXIII. Evolve Practice Questions (3,000+)

Evolve offers a substantial bank of over 3,000 multiple-choice practice questions specifically designed for CDA exam preparation. These questions, accessible alongside the print book, are meticulously modeled after the format and content of the Certified Dental Assistant (CDA) examination.

A key benefit of Evolve’s question bank is the inclusion of detailed answers and rationales for each question. This allows candidates to not only assess their knowledge but also understand the reasoning behind correct and incorrect answers, reinforcing learning.

Consistent practice with these questions builds confidence and familiarity with the exam’s style, ultimately enhancing performance. Evolve’s extensive question pool provides a comprehensive review and identifies areas needing further study.

XXIV. Child Dental Benefits Schedule (CDBS) Updates

The Child Dental Benefits Schedule (CDBS) is an Australian Government initiative providing access to basic dental services for eligible children, capped over a two-calendar-year period. Understanding the CDBS is crucial for dental assistants, as it impacts billing and treatment planning.

The schedule is based on the Australian Dental Association Australian Schedule of Dental Services and Glossary, 13th Edition, utilizing a two-digit prefix for CDBS dental items. Regular updates occur, so staying current is vital.

Dental assistants should be familiar with eligibility criteria and benefit limits. Promoting preventative care – regular check-ups from the appearance of the first tooth or by a child’s first birthday – is also key.

Posted in PDF

lovevery play guide

Lovevery Play Guide: A Comprehensive Overview (Updated 12/22/2025)

Lovevery’s thoughtfully designed play kits, paired with a detailed play guide, support child development through curated toys and milestone-based activities, as of today’s date.

What is Lovevery?

Lovevery is a subscription-based brand delivering stage-based play essentials directly to families. They focus on creating high-quality, thoughtfully designed toys and activities that support a child’s development during their first few years.

Each Lovevery kit includes a Play Guide, which is arguably the most important component. This guide provides parents with valuable insights into their child’s developmental milestones and offers practical ideas for engaging play. The kits aren’t just about the toys themselves; they’re about fostering connection and learning between parent and child.

The Core Philosophy Behind Lovevery Play Kits

Lovevery’s core philosophy centers around supporting child development through purposeful play, guided by research and informed by Montessori and Waldorf principles. The Play Guide is integral to this, offering parents a deeper understanding of how and why each activity promotes growth.

They believe in thinking about both the child and the parent, providing tools for connection and learning. The kits aren’t simply about entertainment; they’re designed to encourage engagement and foster a strong parent-child bond, all detailed within the comprehensive Play Guide.

Understanding the Lovevery Play Guide

The Lovevery Play Guide is arguably the most important component of each kit, offering invaluable information about developmental milestones and how the toys support them. It details the order in which to introduce activities, maximizing engagement and learning potential.

Beyond simply what to do, the Play Guide explains why each activity is beneficial, empowering parents to understand their child’s growth. It provides tips for adapting activities to individual paces and fostering independent play, making it a truly comprehensive resource.

Key Features of the Lovevery Play Guide

The Lovevery Play Guide boasts several key features designed to enhance the play experience. Milestone-Based Development is central, aligning activities with a child’s evolving abilities. It’s packed with Play Ideas & Activities, offering clear instructions and variations.

Furthermore, the guide isn’t just about toys; it’s about connection. It provides insights into a child’s cognitive, social, and emotional growth, helping parents understand and nurture their little one’s development through play, making it a holistic resource.

Milestone-Based Development

Lovevery’s commitment to milestone-based development is a cornerstone of their Play Guide. Each kit and its accompanying guide are meticulously designed to support a child’s progress through key developmental stages. The guide details expected milestones, offering parents a clear understanding of what to anticipate.

Activities aren’t arbitrary; they’re intentionally chosen to foster skills aligned with these milestones, ensuring that play is both engaging and beneficial for a child’s cognitive and physical growth, as highlighted in reviews.

Play Ideas & Activities

The Lovevery Play Guide excels in providing parents with a wealth of play ideas and activities. It moves beyond simply providing toys, offering detailed instructions and suggestions on how to engage with them effectively. The guide outlines a suggested play sequence, maximizing learning potential.

Parents appreciate the guidance, especially those new to Montessori-inspired play. Activities are designed to be adaptable, encouraging parents to tailor them to their child’s unique interests and pace, fostering a joyful learning experience.

Lovevery Play Kits by Age Group

Lovevery structures its offerings around age-appropriate development, delivering Play Kits designed for specific stages. The Play Guide details each kit’s focus, from the Newborn Kit (0-12 weeks) emphasizing sensory exploration, to the Looker Kit (4-6 months) introducing visual tracking and early problem-solving.

Each kit’s contents and suggested activities are carefully aligned with key milestones, ensuring optimal engagement and learning. The Play Guide helps parents understand what to expect and how to support their child’s growth.

The Newborn Play Kit (0-12 Weeks)

The Newborn Play Kit focuses on early sensory development, featuring high-contrast mobiles, a textured ball, and a Play Guide offering insights into newborn milestones. The Play Guide emphasizes simple interactions to stimulate visual and tactile exploration.

Activities within the Play Guide encourage bonding and support the baby’s developing focus. Parents learn how to use the included materials to promote visual tracking and grasp reflexes, fostering early cognitive skills, as detailed in the comprehensive Play Guide.

The Looker Play Kit (4-6 Months)

The Looker Play Kit builds upon early sensory exploration, introducing toys that encourage reaching, grasping, and tummy time. The accompanying Play Guide details activities to support developing motor skills and hand-eye coordination. It provides guidance on how to engage with the baby during playtime.

The Play Guide highlights the importance of introducing varied textures and colors, fostering visual discrimination. Parents will find suggestions for creating a stimulating environment, promoting cognitive growth, and strengthening the parent-child bond, all within the Play Guide’s framework.

Benefits of Using Lovevery Play Kits

Lovevery Play Kits, guided by the comprehensive Play Guide, offer numerous developmental benefits. They promote cognitive development through thoughtfully designed toys and activities, fostering problem-solving skills and curiosity. The Play Guide encourages independent play, allowing children to explore and learn at their own pace.

Furthermore, the kits support social-emotional growth, providing opportunities for self-discovery and confidence-building. The Play Guide empowers parents with the knowledge to actively participate in their child’s learning journey, creating a nurturing and stimulating environment.

Promoting Cognitive Development

Lovevery’s Play Guide meticulously outlines how each toy within the kits fosters cognitive growth. Activities are designed to stimulate problem-solving, critical thinking, and spatial reasoning skills in young children. The Play Guide details how to introduce concepts like shape sorting, object permanence, and cause-and-effect through engaging play.

These kits aren’t just about fun; they’re about building a strong foundation for future learning. The Play Guide helps parents understand developmental milestones and provides targeted activities to support each stage of cognitive development.

Encouraging Independent Play

A key benefit highlighted in the Lovevery Play Guide is the promotion of independent play. The thoughtfully designed toys encourage children to explore, experiment, and learn at their own pace, fostering self-reliance and confidence. The Play Guide offers suggestions for setting up inviting play spaces and gradually reducing direct parental involvement.

This allows children to develop crucial problem-solving skills and creativity while building a sense of autonomy. Parents appreciate how Lovevery supports their child’s ability to engage in focused, self-directed play.

A Deep Dive into the Reading Skillset Play Kit

The Lovevery Reading Skillset Play Kit, detailed within the Play Guide, is a research-backed literacy program designed to foster early reading skills. It’s proven to boost reading scores in 98% of children, offering a modern, screen-free approach. The Play Guide provides parents with structured activities and insights into supporting their child’s literacy journey.

This kit focuses on phonological awareness, letter recognition, and early reading comprehension, all presented through engaging, high-quality materials. It’s now available in Australia, expanding its reach.

Research-Backed Literacy Program

Lovevery’s Reading Skillset Play Kit centers around a rigorously developed literacy program, detailed in the Play Guide, designed by experts in early childhood development. This program isn’t just intuitive; it’s demonstrably effective, boasting a 98% success rate in boosting children’s reading scores.

The Play Guide explains the program’s foundations, emphasizing phonological awareness and letter recognition. It’s a screen-free alternative, offering a tangible and engaging learning experience for young readers, now accessible in Australia.

Boosting Reading Scores

Lovevery’s Reading Skillset Play Kit isn’t simply about introducing letters; it’s about demonstrably improving reading proficiency. The Play Guide details how the kit’s activities are specifically designed to enhance key literacy skills. Impressively, the program has proven to boost reading scores in an astounding 98% of children who utilize it.

This success is rooted in a research-backed approach, offering a modern, screen-free method for fostering a love of reading and building a strong foundation for future academic success, as outlined within the Play Guide.

Pros and Cons of Lovevery Play Kits

Lovevery Play Kits offer significant advantages, notably their well-made, long-lasting toys that grow with the child. The engaging and inviting nature of the kits encourages independent play, a crucial developmental benefit. However, the Play Guide acknowledges a key drawback: the cost.

The subscription model, while convenient, represents a substantial investment. While the quality and developmental focus are high, budget-conscious parents may find the price point prohibitive, as detailed in customer reviews.

Advantages: Quality & Engagement

Lovevery Play Kits consistently receive praise for their exceptional quality. Toys are designed to be durable and withstand enthusiastic play, offering lasting value. The Play Guide enhances this by suggesting ways to maximize toy use across developmental stages.

Furthermore, the kits are remarkably engaging, captivating children’s attention and fostering a love of learning. Parents appreciate how the thoughtfully curated items promote exploration and independent play, as highlighted in numerous customer experiences.

Disadvantages: Cost & Subscription Model

A primary drawback of Lovevery Play Kits is their relatively high cost compared to other toy options. The subscription model, while convenient, represents an ongoing financial commitment that may not suit all budgets. Some parents find the price point prohibitive, especially considering the availability of DIY alternatives.

Additionally, the subscription requires planning and commitment, and pausing or canceling can be less straightforward than one-time purchases. This aspect is a common concern voiced in customer feedback.

Comparing Lovevery to DIY Alternatives

While Lovevery offers convenience and curated development, many parents consider DIY alternatives. Creating similar play experiences requires significant time investment for material sourcing and construction. Achieving the same quality control and thoughtfully designed aesthetic as Lovevery can be challenging.

DIY routes often lack the detailed Play Guide offering milestone-based activity suggestions. Lovevery’s expertise in child development is a key differentiator, making it a potentially valuable investment despite the higher upfront cost.

Time Investment & Material Sourcing

Attempting a DIY approach mirroring Lovevery necessitates substantial time dedicated to locating appropriate materials. Sourcing items of comparable quality proves remarkably time-consuming, as one parent noted. Constructing toys that meet safety standards and offer similar developmental benefits demands considerable effort.

The Play Guide included with Lovevery represents a significant time-saver, eliminating the need to research and plan activities independently. This convenience is a major factor for busy parents.

Quality Control & Design

Lovevery distinguishes itself through rigorous quality control and intentional design. Toys are crafted to be both fun and educational, exhibiting durability and safety. Customer reviews consistently highlight the well-made nature of the products, ensuring longevity and repeated use.

DIY alternatives often struggle to replicate this level of refinement. Maintaining consistent quality and adhering to developmental principles requires expertise, which Lovevery’s Play Guide and product design embody.

Customer Reviews and Experiences

Lovevery consistently receives positive feedback regarding toy quality and the comprehensive Play Guide. Parents appreciate the thoughtfully curated kits and the developmental support they offer; Many reviewers note the toys are engaging and encourage independent play, fostering a child’s curiosity.

Customers also value the Play Guide’s insights into milestones and suggested play sequences. The overall experience is often described as a worthwhile investment in a child’s early development, exceeding expectations.

Positive Feedback on Toy Quality

Lovevery toys are repeatedly praised for their exceptional quality and durability. Customers highlight the use of sustainable materials and meticulous craftsmanship, ensuring longevity and safety for little ones. The toys are described as “well-made” and capable of withstanding enthusiastic play.

Reviewers frequently mention the aesthetically pleasing design and engaging textures, capturing a child’s attention. The Play Guide complements this, suggesting ways to maximize the toys’ developmental benefits, solidifying positive experiences.

Appreciation for the Play Guide

Lovevery’s Play Guide receives consistent acclaim from parents, lauded as an invaluable resource for understanding child development. It provides clear guidance on milestones, offering insights into how and why to play with each toy. Parents appreciate the suggested play sequences and the ability to adapt activities to their child’s individual pace.

Many find the guide reduces the time spent researching activities, offering confidence in supporting their child’s growth. It’s considered a key differentiator, enhancing the overall Lovevery experience.

How to Maximize the Use of Your Play Guide

To fully benefit from your Lovevery Play Guide, consistently follow the suggested play sequence, designed by experts to build skills progressively. However, remember that every child develops uniquely; adapt activities to match your child’s current interests and abilities.

Don’t hesitate to revisit older play suggestions as your child’s understanding evolves. Utilize the guide’s milestone information to identify areas where extra support or exploration might be beneficial, fostering optimal learning.

Following the Suggested Play Sequence

Lovevery’s recommended play order isn’t arbitrary; it’s meticulously crafted to support your child’s developmental journey. The play guide outlines a sequence building upon previously learned skills, ensuring a solid foundation for future growth.

Starting with the initial activities and progressing systematically allows children to master concepts at their own pace. This approach maximizes engagement and learning potential, as each toy and activity naturally leads to the next, fostering a love for exploration.

Adapting Activities to Your Child’s Pace

While the Lovevery play guide offers a structured sequence, remember every child develops uniquely. Don’t hesitate to slow down or revisit activities if your little one needs more time to grasp a concept. Observe their engagement and adjust accordingly.

If an activity feels too challenging, pause and return to it later. Conversely, if they quickly master a skill, move forward. The play guide is a tool, not a rigid rulebook; prioritize your child’s individual learning journey.

Lovevery’s Global Expansion and Availability

Lovevery has expanded beyond its initial launch, bringing its developmental support to families worldwide. Notably, Lovevery launched in Australia in July 2025, offering its research-backed literacy program and play kits to a new market.

Previously, availability was limited, but now international shipping options are increasingly accessible. This expansion demonstrates Lovevery’s commitment to providing quality early childhood resources globally, ensuring more children benefit from their thoughtfully designed play experiences and accompanying play guide.

Launch in Australia

Lovevery officially launched in Australia in July 2025, marking a significant milestone in its global expansion. This launch brought the brand’s acclaimed play kits and comprehensive play guide to Australian families, offering a screen-free approach to early childhood development.

The introduction of the Reading Skill Set, proven to boost reading scores in 98% of children, was a key feature of this expansion. Australian parents now have access to Lovevery’s research-backed resources, supporting their child’s learning journey.

International Shipping Options

While Lovevery initially focused on specific markets, they’ve expanded international shipping to reach more families globally. Access to the play guide and developmental toys is now broader, though shipping costs and availability vary by location.

Customers outside core markets should check the Lovevery website for current shipping policies and potential import duties. The brand continues to optimize its logistics to provide convenient access to its play kits and supporting resources worldwide, enhancing early childhood education.

five love languages test pdf

Discovering your emotional connection style is key! Many seek a free PDF version of the test, aiming to understand how they express and experience affection.

Over 500,000 users have already explored their love language, with resources available online to enhance relationships and deepen emotional bonds.

Understanding these languages, popularized by Gary Chapman, can resolve misunderstandings and foster stronger connections with loved ones.

What are the Five Love Languages?

The Five Love Languages represent distinct ways individuals prefer to give and receive affection. These aren’t merely preferences, but fundamental emotional needs that, when met, foster feelings of love and security within a relationship. Many individuals begin their journey of discovery by seeking a five love languages test PDF, hoping to quickly identify their primary language.

These languages include Words of Affirmation – expressing affection through spoken or written praise; Quality Time – giving undivided attention; Receiving Gifts – tokens of affection, symbolizing thoughtfulness; Acts of Service – actions rather than words demonstrating care; and Physical Touch – expressing love through physical affection.

Identifying your primary language, and that of your partner, is crucial. Miscommunication often arises when partners express love in ways that aren’t received as intended. A PDF test can be a starting point, but deeper understanding requires open communication and a willingness to learn each other’s emotional needs.

Ultimately, recognizing these languages promotes empathy and strengthens emotional bonds.

The Origin of the Concept: Gary Chapman

The concept of the Five Love Languages originated with Gary Chapman, a marriage counselor and pastor. Observing patterns in couples seeking guidance, Chapman identified that many relationship issues stemmed from partners expressing love in ways their significant others didn’t recognize or appreciate. He formalized these observations into his groundbreaking 1992 book, “The 5 Love Languages: The Secret to Love that Lasts.”

Chapman’s work wasn’t based on extensive scientific research, but rather on decades of practical experience counseling couples. He noticed recurring themes in what made individuals feel loved, leading to the categorization of these expressions into five distinct languages.

The popularity of his theory has led to the creation of numerous resources, including the official five love languages test PDF and online quizzes. These tools aim to help individuals self-identify their primary love language, facilitating better communication and understanding within relationships.

Chapman’s enduring legacy lies in providing a simple yet powerful framework for improving emotional connection.

Understanding the Five Love Languages

Identifying your love language, often through a PDF test, unlocks deeper self-awareness. It reveals how you best receive and express affection, fostering stronger bonds.

Knowing this helps navigate relationships, improving communication and emotional fulfillment with your partner.

Words of Affirmation

For those whose primary love language is Words of Affirmation, verbal expressions of love, appreciation, and encouragement are profoundly meaningful. This isn’t about grand gestures, but consistent, heartfelt communication. Discovering this preference often begins with taking a love language assessment, with many seeking a convenient PDF version online.

Individuals with this love language thrive on hearing “I love you,” compliments, and words of support. Criticism, even constructive, can be particularly hurtful. They value spoken or written words that validate their feelings and acknowledge their worth. A free online quiz, or a downloadable PDF test, can pinpoint if this resonates with you.

Understanding this language is crucial for building strong relationships. If your partner’s love language is Words of Affirmation, make a conscious effort to verbally express your affection and appreciation. Conversely, if yours is, communicate this need clearly. The 5 Love Languages resources emphasize the power of intentional communication.

Quality Time

Those who resonate with Quality Time as their primary love language feel most cherished when their partner dedicates focused, undivided attention. This isn’t simply being in the same room; it’s about creating meaningful connections through shared experiences and genuine presence. Many begin their journey of discovery with a PDF version of the Five Love Languages test, readily available online.

Distractions – phones, television, or other commitments – diminish the value of time spent together. Active listening, engaging conversations, and shared activities are key. A free online quiz, or a downloadable PDF assessment, can help identify if this is your dominant way of giving and receiving love.

If your partner values Quality Time, prioritize dedicated moments together. Schedule regular date nights, put away distractions during conversations, and actively participate in shared hobbies. Recognizing this need, often revealed through a love language test PDF, strengthens emotional bonds and fosters deeper intimacy.

Receiving Gifts

For individuals whose primary love language is Receiving Gifts, the thoughtfulness behind a present speaks volumes. It’s not necessarily about the monetary value, but the visible symbol of affection and consideration. Taking a Five Love Languages test, often found as a convenient PDF download, can illuminate this preference.

The gift itself serves as a tangible reminder of the relationship and the giver’s care. It demonstrates that the partner was thinking of them, even during busy times. Many utilize free online versions or seek a comprehensive PDF test to pinpoint their love language accurately.

It’s important to understand that this isn’t about materialism. It’s about the intentionality and effort put into selecting a gift that reflects the recipient’s interests and personality. Discovering this through a love language assessment PDF allows partners to express love in a way that truly resonates.

Acts of Service

For those who resonate with Acts of Service as their primary love language, actions truly speak louder than words. This isn’t about grand gestures, but rather the consistent, helpful things a partner does to ease burdens and demonstrate care. Many individuals begin their journey of discovery by taking a Five Love Languages test, readily available as a PDF online.

These acts can range from simple tasks like doing the dishes or running errands, to more significant contributions like helping with a project or taking care of a responsibility. A PDF version of the test can help identify if this is a core need for affection.

Understanding this love language is crucial because a lack of helpful actions can be deeply felt. It communicates a lack of thoughtfulness or willingness to contribute to the relationship. Utilizing a free PDF test can unlock deeper understanding and improve communication.

Physical Touch

Individuals whose primary love language is Physical Touch thrive on physical expressions of affection. This extends far beyond intimacy; it encompasses hugs, holding hands, a comforting touch on the arm, and even playful nudges. Discovering this preference often begins with exploring resources like the Five Love Languages test, frequently found as a downloadable PDF.

For these individuals, physical touch is a fundamental need, a powerful communicator of love and security. A lack of physical affection can leave them feeling unloved or disconnected. Taking a free PDF version of the test can provide valuable insight into this core emotional need.

It’s important to note that this isn’t solely about sexual touch, but rather the consistent reassurance and connection conveyed through physical closeness. A PDF test result can help partners understand and cater to this vital expression of love, strengthening the emotional bond.

Taking the Five Love Languages Test

Numerous online options and PDF formats exist to determine your love language! A quick, five-minute quiz helps reveal how you best give and receive affection.

Explore both free and paid versions to unlock detailed results and personalized insights into your relationship needs.

Availability of the Test: Online and PDF Formats

The official Five Love Languages quiz is readily accessible online through the 5lovelanguages website, offering a convenient and interactive experience. However, many individuals actively seek a PDF version for offline access or ease of sharing. While a directly downloadable official PDF isn’t prominently offered, various unofficial versions circulate, often mirroring the online questionnaire.

These unofficial PDFs allow users to complete the test without an internet connection, making them a practical option for those with limited access. The online quiz, however, typically provides immediate results and a more detailed breakdown of your love language percentages. Several websites host free versions of the test, though these may not offer the comprehensive analysis found in the paid options.

It’s important to note that the accuracy and reliability of unofficial PDF versions can vary. The official website ensures the test’s integrity and provides the most accurate assessment based on Dr. Gary Chapman’s research. Regardless of the format chosen, understanding your love language can significantly improve your relationships.

Free vs. Paid Versions of the Test

The core questionnaire for identifying your love language is available through free online quizzes and, as users seek, in PDF format. However, a key difference lies in the depth of the results provided. Free versions often offer a general indication of your primary love language, but may lack the detailed percentage breakdown for each of the five languages – a feature many find valuable.

Paid versions, typically accessed through the official 5lovelanguages website, unlock a more comprehensive report. This includes a precise percentage for each love language, offering a nuanced understanding of your emotional expression and needs. Users on Reddit have discussed this change, noting the previous availability of full results in the free version.

The added detail in the paid report can be particularly helpful for couples, facilitating deeper conversations and targeted efforts to strengthen their connection. While the free PDF or online test provides a starting point, investing in the paid version offers a more thorough and insightful experience, ultimately enhancing relationship understanding.

Reddit Discussions on Free Alternatives (as of 2024)

As of May 10, 2024, a thread on r/LoveLanguages reveals user frustration regarding the official quiz’s shift to a paywall for complete results. Many express a preference for the detailed percentage breakdowns previously available without charge, finding them crucial for self-understanding and relationship improvement.

Discussions center around seeking viable free alternatives, including various online quizzes and the possibility of locating a comprehensive PDF version of the test. Users share experiences with different free options, noting that while they provide a general idea of love language preferences, they often lack the granularity of the paid report.

The consensus leans towards the official quiz being superior in accuracy and detail, but the cost is a barrier for some. Reddit users actively share links and recommendations for free resources, acknowledging their limitations while still valuing the insight they offer. The search for a truly equivalent free alternative continues within the community.

Analyzing Your Results

Interpreting your PDF test results reveals your primary love language, offering insights into how you best give and receive affection.

Percentage breakdowns highlight strengths in each language, guiding you toward improved communication and deeper connections.

Utilize these findings to nurture relationships by expressing love in ways that resonate with your partner’s needs.

Interpreting Your Primary Love Language

Once you’ve completed a Five Love Languages test, often found as a downloadable PDF, understanding your dominant language is crucial. This isn’t about limiting yourself to one expression of love, but rather recognizing the way you most naturally feel loved and appreciated.

If your results indicate “Words of Affirmation” as primary, verbal acknowledgements, compliments, and encouraging words are deeply meaningful. For “Quality Time,” undivided attention, focused conversations, and shared experiences are paramount. “Receiving Gifts” isn’t about materialism; it’s the thoughtfulness behind the gesture that resonates.

“Acts of Service” individuals feel loved when burdens are lifted through helpful actions – chores, errands, or practical support. Finally, “Physical Touch” thrives on closeness, affection, and physical expressions of love.

Remember, your primary language influences how you interpret your partner’s expressions. Misunderstandings often arise when love is given in a way that doesn’t align with how it’s received. Recognizing this dynamic is the first step towards a more fulfilling connection.

Understanding Percentage Breakdowns

The Five Love Languages test, whether taken online or via a PDF version, typically provides a percentage breakdown for each of the five languages: Words of Affirmation, Quality Time, Receiving Gifts, Acts of Service, and Physical Touch. These percentages aren’t rigid categories, but rather indicators of your preferences.

A significant disparity – for example, 70% in Quality Time and 5% in Receiving Gifts – suggests a strong preference for focused attention and minimal importance placed on material tokens. Conversely, a more even distribution indicates a broader capacity to both give and receive love in various ways.

It’s important to note that even a low percentage doesn’t mean you dislike a particular language; it simply means it’s not your primary way of feeling loved. Reddit discussions highlight the value of seeing these breakdowns, as they offer nuanced self-awareness;

Use these percentages as a starting point for communication with your partner, explaining what resonates most deeply with you and understanding their profile as well.

Using Results to Improve Relationships

Once you and your partner have completed a Five Love Languages assessment – be it the official version or a PDF alternative – the real work begins. Understanding each other’s primary love languages is a powerful tool for strengthening your bond.

If your partner’s language is Acts of Service, offering to help with chores or tasks will resonate far more deeply than expensive gifts. Conversely, if their language is Words of Affirmation, sincere compliments and expressions of appreciation are crucial.

Don’t assume your partner experiences love in the same way you do. Consciously “speak” their language, even if it doesn’t come naturally. This demonstrates effort and a willingness to meet their emotional needs.

Open communication is key. Discuss your results, share examples of what makes you feel loved, and be patient as you both learn to navigate these new insights. This fosters empathy and a deeper connection.

Resources and Further Exploration

Explore the official 5 Love Languages website for quizzes and resources! PDF versions of tests are available, alongside related materials to deepen your understanding.

Dive into articles and events, enhancing your relationships through Chapman’s insightful theory and practical application of love languages.

Official 5 Love Languages Website

The official 5 Love Languages website (5lovelanguages.com) serves as a central hub for all things related to Dr. Gary Chapman’s renowned theory. It provides direct access to the official Love Language Quiz, although recent discussions on Reddit (as of May 10, 2024) indicate that full results, including detailed percentage breakdowns for each language, may now require payment. Previously, these breakdowns were freely available.

Beyond the quiz, the website offers a wealth of resources, including articles, quizzes, and information about events and workshops. Users can explore the nuances of each love language – Words of Affirmation, Quality Time, Receiving Gifts, Acts of Service, and Physical Touch – and learn how to effectively communicate their needs and appreciate their partner’s expressions of love.

While a free version of the quiz is still accessible, it may offer a less comprehensive analysis than the paid version. The site also features a store where you can purchase books, guides, and other materials to further enhance your understanding and application of the Five Love Languages in your relationships. It’s a comprehensive resource for anyone seeking to improve their emotional connection with others.

Related Quizzes and Resources

Numerous online quizzes attempt to replicate the functionality of the official Five Love Languages assessment, often advertised as “free alternatives,” particularly in response to changes in the official quiz’s access to detailed results (Reddit discussions, May 2024). These vary in quality and depth, but can provide a starting point for self-exploration.

Beyond simple quizzes, resources like articles discussing common relationship arguments stemming from mismatched love languages are readily available. These highlight scenarios where a partner’s need for “words of affirmation” isn’t met, or appreciation isn’t shown in a preferred manner.

Exploring broader relationship compatibility assessments can complement the Love Languages framework. While not directly related, these tools can offer insights into communication styles and emotional needs. Remember that understanding your love language is just one piece of the puzzle; effective communication and mutual effort are crucial for a thriving relationship. Searching for “Love Language test PDF” will yield various options, but exercise caution regarding data privacy and accuracy.

The Impact of Understanding Love Languages (as of 2023)

As of 2023, the concept of Love Languages continues to resonate, influencing relationship advice and self-help resources. The desire for a readily accessible “five love languages test PDF” reflects a growing awareness of the importance of emotional connection and personalized expression of affection.

Understanding your primary love language – and that of your partner – can significantly reduce miscommunication and conflict. Recognizing that love isn’t “one-size-fits-all” fosters empathy and encourages intentional acts of love tailored to individual needs.

The framework helps individuals articulate their emotional requirements, moving beyond generalized expressions of love. This clarity strengthens bonds and builds trust. While the official quiz has seen changes in access to detailed results, the core principles remain valuable. Ultimately, the impact lies in fostering self-awareness and promoting more fulfilling relationships through intentional connection.

Posted in PDF

cook essentials air fryer manual

Cooks Essentials Air Fryer Manual: A Comprehensive Guide

This manual provides detailed instructions for your Cooks Essentials air fryer, covering setup, operation, cleaning, and troubleshooting for optimal cooking results.

Explore preset cooking settings, food preparation tips, and advanced features to unlock the full potential of your versatile appliance, ensuring perfectly fried delights.

Welcome! Your Cooks Essentials Air Fryer is a versatile appliance designed to deliver the delicious taste of fried food with significantly less oil. This innovative kitchen tool utilizes rapid air circulation technology to cook a wide variety of your favorite dishes, from crispy french fries and succulent chicken to perfectly baked cakes and desserts.

This air fryer offers a healthier alternative to traditional deep frying, allowing you to enjoy guilt-free versions of your beloved meals. With its user-friendly controls and preset cooking functions, achieving professional-quality results is easier than ever. The manual will guide you through each step, ensuring a seamless and enjoyable cooking experience.

Prepare to rediscover your favorite recipes and explore new culinary possibilities with your Cooks Essentials Air Fryer – a smart and convenient addition to any kitchen!

Understanding the Components

Your Cooks Essentials Air Fryer consists of several key components working together to deliver exceptional cooking performance. The primary elements include the cooking unit itself, housing the heating element and fan, and the removable cooking basket and pan. These are designed for easy cleaning and food placement.

The control panel features intuitive buttons for power, temperature adjustment, timer settings, and preset cooking functions. Pay attention to the air vents located on the top and back of the unit; these are crucial for proper air circulation. Familiarize yourself with each part to ensure safe and efficient operation.

Understanding these components will help you maximize the air fryer’s capabilities and maintain it properly for years of reliable use. Refer to the diagrams within this manual for a visual guide to each part.

Safety Precautions

Prioritizing safety is paramount when operating your Cooks Essentials Air Fryer. Always ensure the unit is placed on a stable, heat-resistant surface away from flammable materials. Never immerse the cooking unit, cord, or plug in water or other liquids.

Electrical Safety Guidelines dictate that you should only use a grounded outlet and avoid using extension cords. Do not operate the appliance if the cord or plug is damaged. Supervise children closely when the air fryer is in use, as surfaces become hot during operation.

Never cover the air vents during cooking, as this can cause overheating and damage. Allow the unit to cool completely before cleaning. Disconnect from the power outlet when not in use and before cleaning. Following these precautions will ensure safe and enjoyable cooking.

Important Safety Instructions

Read all instructions before using your Cooks Essentials Air Fryer. To prevent electric shock, do not immerse the cord, plug, or appliance in water. Close supervision is necessary when the appliance is used by or near children. Unplug from outlet when not in use and before cleaning.

Do not operate the appliance with a damaged cord or plug, or after the appliance malfunctions. The use of accessory attachments not recommended by the manufacturer may result in fire, electric shock, or injury. Avoid touching hot surfaces; use handles or knobs.

Always allow the air fryer to cool completely before cleaning. Ensure proper ventilation during operation. Never operate the appliance unattended. These instructions are crucial for safe operation and preventing potential hazards.

Electrical Safety Guidelines

Your Cooks Essentials Air Fryer operates on 220-240V, 50/60Hz, and 1700W. Always ensure the voltage matches your household supply. Never use an extension cord; plug directly into a grounded outlet. Do not operate the appliance with a damaged cord or plug – discontinue use immediately.

Avoid using the air fryer in damp environments or near water sources. If the appliance gets wet, unplug it immediately and do not attempt to use it. Never attempt to repair the appliance yourself; contact qualified service personnel for assistance.

Regularly inspect the power cord for damage. A damaged cord poses a significant electrical hazard. Proper grounding is essential for safe operation. Following these electrical safety guidelines will minimize the risk of shock or fire.

Getting Started: Initial Setup

Before your first use of the Cooks Essentials Air Fryer, careful setup is crucial. Begin by unboxing and thoroughly inspecting the unit for any damage sustained during shipping. Verify all components are present, referencing the included parts list. Remove all packaging materials, both inside and outside the fryer.

Next, perform a comprehensive cleaning. Wash the basket and pan with warm, soapy water, ensuring all manufacturing residues are removed. Wipe down the interior and exterior surfaces with a damp cloth. Do not immerse the main unit in water.

Ensure the air fryer is placed on a stable, heat-resistant surface with adequate ventilation. Avoid placing it near flammable materials. Now, your air fryer is ready for operation!

Unboxing and Inspection

Upon receiving your Cooks Essentials Air Fryer, begin by carefully opening the packaging. Retain the original box and packing materials for potential future transport or warranty claims. Gently lift the air fryer out of the box and place it on a protected surface to prevent scratches.

Thoroughly inspect the unit for any visible signs of damage that may have occurred during shipping. Check for dents, cracks, or broken parts. Verify that all included accessories, as listed in the manual, are present. This includes the frying basket, pan, and any additional components.

If any damage or missing parts are discovered, immediately contact Customer Support (see warranty information) before attempting to use the appliance. Do not attempt to operate a damaged unit.

Cleaning Before First Use

Before operating your Cooks Essentials Air Fryer for the first time, a thorough cleaning is essential. This removes any manufacturing residue and ensures food safety. Begin by washing the frying basket and pan with warm, soapy water. Use a non-abrasive sponge or cloth to avoid damaging the non-stick coating.

Rinse thoroughly and dry completely. Next, wipe down the interior and exterior of the air fryer with a damp cloth. Do not immerse the main unit in water or any other liquid. Ensure no water enters the air vents.

Allow all components to air dry completely before reassembling and using the appliance. This initial cleaning process prepares your air fryer for optimal performance and ensures your first culinary creations are delicious and safe.

Operating Instructions

To begin using your Cooks Essentials Air Fryer, ensure it’s placed on a stable, heat-resistant surface. Plug the unit into a grounded electrical outlet. The power button will initiate operation. Familiarize yourself with the control panel, which typically includes buttons for power, temperature adjustment, and timer settings.

Place your prepared food inside the frying basket, ensuring it’s not overcrowded to allow for proper air circulation. Insert the basket securely into the air fryer. Set the desired temperature and cooking time using the control panel.

The air fryer will automatically shut off when the timer reaches zero. Always use oven mitts when removing the hot basket. Explore the preset functions for convenient cooking options.

Powering On and Basic Controls

Powering on your Cooks Essentials Air Fryer is straightforward. Locate the power button, usually clearly marked, and press it firmly. The display panel will illuminate, indicating the unit is active. Basic controls typically involve two main dials or buttons: one for temperature and another for time.

The temperature control allows you to set the desired cooking heat, usually ranging from 180°F to 400°F. The timer control lets you specify the cooking duration. Adjust these settings by rotating the dials or pressing the corresponding buttons to increase or decrease the values.

Some models feature a digital display showing the set temperature and remaining time. Ensure the basket is properly inserted before starting a cooking cycle.

Using the Preset Cooking Functions

Your Cooks Essentials Air Fryer offers convenient preset functions designed for common foods. These pre-programmed settings automatically adjust the temperature and time for optimal results. Typically, there are four presets: French Fries/Potato, Chicken, Fish, and Cake/Dessert.

To utilize a preset, simply press the corresponding button on the control panel. The air fryer will then initiate the pre-set cooking program. While presets are helpful, remember that food thickness and quantity can affect cooking times.

For best results, consult the “Preset Cooking Settings Explained” section of this manual for specific recommendations. You can always adjust the time or temperature manually if needed, overriding the preset function for customized cooking.

Preset Cooking Settings Explained

This section details the pre-programmed settings on your Cooks Essentials Air Fryer. The French Fries/Potato setting is optimized for crispy results, typically around 400°F (200°C) for 15-20 minutes, shaking halfway through. The Chicken setting generally cooks at 360°F (180°C) for 20-25 minutes, ensuring thorough cooking and golden-brown skin.

For Fish, the preset usually operates at 375°F (190°C) for 10-15 minutes, delivering flaky and tender results. The Cake/Dessert setting utilizes a lower temperature, around 320°F (160°C) for 20-30 minutes, ideal for baking smaller treats.

Remember these are guidelines; adjust times based on portion size and desired crispness. Always refer to food safety guidelines for internal temperature recommendations.

French Fries/Potato Setting

The French Fries/Potato preset on your Cooks Essentials Air Fryer is designed for achieving perfectly crispy fries or roasted potatoes with minimal effort. Typically, this setting operates around 400°F (200°C) for 15 to 20 minutes. For optimal results, it’s crucial to avoid overcrowding the basket; work in batches if necessary.

Before air frying, ensure potatoes are cut into uniform sizes and lightly coated with oil. Instructions recommend shaking the basket halfway through the cooking process to promote even browning and crisping. Adjust cooking time based on desired crispness and potato thickness.

Experiment with seasonings before or after air frying for customized flavor profiles. This preset is also suitable for sweet potato fries and other root vegetables.

Chicken Setting

The Chicken preset on your Cooks Essentials Air Fryer is tailored for cooking various chicken pieces, offering a crispy exterior and juicy interior. This setting generally operates around 375°F (190°C) for 20-25 minutes, depending on the thickness and quantity of the chicken.

For best results, ensure chicken pieces are evenly coated with oil and seasonings. It’s recommended to flip the chicken halfway through the cooking cycle to ensure uniform browning. Avoid overcrowding the basket to allow for proper air circulation.

Internal temperature should reach 165°F (74°C) for safe consumption. This preset works well with chicken wings, drumsticks, and boneless, skinless breasts – adjust time accordingly.

Fish Setting

The Fish preset on your Cooks Essentials Air Fryer is designed to deliver perfectly cooked fish with a delightfully crispy coating. Typically, this setting operates at approximately 360°F (182°C) for 10-15 minutes, though timing varies based on fish thickness and type.

Lightly oiling the fish and seasoning it well enhances flavor and crispness. For breaded fish, ensure the coating adheres firmly. Avoid overcrowding the basket; cook in batches if necessary for optimal air circulation.

Check for flakiness with a fork to determine doneness – the fish should easily separate. Internal temperature should reach 145°F (63°C). This preset is suitable for salmon, cod, tilapia, and other popular fish varieties.

Cake/Dessert Setting

The Cake/Dessert preset on your Cooks Essentials Air Fryer allows you to bake small cakes, muffins, or other sweet treats without a traditional oven. This setting generally operates around 320°F (160°C) for 20-30 minutes, but baking times depend heavily on the recipe and pan size.

Use air fryer-safe baking pans or silicone molds. Lightly grease the pan to prevent sticking. Check for doneness by inserting a toothpick into the center; if it comes out clean, the dessert is ready.

Avoid overfilling the pan, as the dessert may overflow during baking. This setting is ideal for quick and convenient dessert preparation, offering a crispy exterior and a moist interior.

Cooking with Your Air Fryer

Cooking with your Cooks Essentials Air Fryer is simple and efficient! Proper food preparation is key – ensure foods are evenly coated with oil for optimal crisping. Avoid overcrowding the basket; work in batches for best results, allowing for proper air circulation.

Recommended cooking times and temperatures vary based on the food type and quantity. Refer to the preset settings as a starting point, but don’t hesitate to adjust manually. Shake or flip food halfway through the cooking process to ensure even browning.

Remember, the air fryer cooks faster than a conventional oven, so frequent checks are recommended. Experiment with different seasonings and marinades to enhance flavor!

Food Preparation Tips

To achieve the best results with your Cooks Essentials Air Fryer, proper food preparation is crucial. For crispy results, lightly coat food with oil – a spray bottle works well for even distribution. Avoid using too much oil, as it can cause smoking.

Cut food into uniform sizes to ensure even cooking. Marinating meats and vegetables beforehand enhances flavor and tenderness. When cooking breaded items, ensure the breading adheres well to prevent it from flying around inside the fryer.

Don’t overcrowd the basket! Working in batches allows for optimal air circulation, leading to crispier, more evenly cooked food. Patting food dry before air frying also promotes better browning.

Recommended Cooking Times & Temperatures

Below are general guidelines; always check for doneness. For French fries/potatoes (3QT models), try 20-25 minutes at 375°F (190°C), shaking halfway through. Chicken pieces typically require 20-30 minutes at 360°F (180°C), ensuring internal temperature reaches 165°F (74°C).

Fish fillets usually cook in 10-15 minutes at 390°F (200°C). Cakes and desserts may need 20-25 minutes at 320°F (160°C). These times are starting points; adjust based on your specific recipe and desired level of crispness.

Remember to preheat the air fryer for optimal results. Smaller portions will cook faster, while larger portions may require extended cooking times. Always refer to the preset function guidelines when available.

Adjusting Cooking Time and Temperature Manually

For customized cooking, manually adjust time and temperature using the control panel. Press the “Time” or “Temperature” buttons to modify settings. Increments vary by model, so consult your specific unit’s display. Remember, precise adjustments are key to achieving desired results.

If food isn’t cooking fast enough, increase the temperature in 5-10°F (3-6°C) increments. For overly browned food, reduce the temperature. Similarly, add or subtract 2-3 minutes to the cooking time as needed.

Regularly check food during manual cooking, shaking or flipping halfway through for even crisping. Experimentation is encouraged to perfect your recipes!

Cleaning and Maintenance

Regular cleaning ensures optimal performance and longevity of your Cooks Essentials air fryer. Always unplug the unit and allow it to cool completely before cleaning. The basket and pan are typically dishwasher-safe, but hand washing with warm, soapy water is recommended to preserve their non-stick coating.

For the interior, wipe down with a damp cloth after each use. Avoid abrasive cleaners, as they can damage the surface. The exterior can be cleaned with a slightly damp cloth. Never immerse the main unit in water.

Consistent maintenance prevents food buildup and ensures hygienic cooking. Address spills immediately to avoid stubborn residue.

Cleaning the Basket and Pan

The basket and pan are key components requiring frequent cleaning. After each use, remove them and wash with warm, soapy water. While often dishwasher-safe, hand washing is preferred to maintain the non-stick coating’s integrity and extend its lifespan.

For stubborn food residue, soak the basket and pan in warm, soapy water for several minutes before scrubbing gently with a non-abrasive sponge. Avoid using steel wool or harsh scouring pads, as these can scratch the surface.

Ensure both are completely dry before reassembling and storing. Proper cleaning prevents food buildup and ensures optimal cooking performance.

Cleaning the Interior and Exterior

Regularly cleaning the interior and exterior of your Cooks Essentials air fryer maintains hygiene and prolongs its life. Always unplug the unit and allow it to cool completely before cleaning. Wipe the exterior with a damp cloth and mild detergent. Avoid abrasive cleaners that could damage the finish.

The interior, excluding the basket and pan, can be wiped down with a damp cloth. Pay attention to any splatters or food debris. For tougher stains, a paste of baking soda and water can be applied gently, then wiped clean.

Never immerse the main unit in water or any other liquid. Ensure all surfaces are dry before reassembling and using the air fryer.

Troubleshooting Common Issues

If your Cooks Essentials air fryer isn’t performing as expected, several common issues can be easily resolved. First, ensure the unit is properly plugged in and the power outlet is functioning. If the air fryer won’t heat, check for error codes (see section on Error Codes).

For food that isn’t crispy, try reducing the amount of food in the basket to allow for better air circulation. Also, ensure you’re not overcrowding the basket. Adjust cooking time or temperature manually if needed.

If you encounter persistent problems, consult the full manual or contact customer support for assistance. Always prioritize safety and avoid attempting repairs yourself.

Troubleshooting: Air Fryer Not Heating

If your Cooks Essentials air fryer isn’t heating, begin by verifying the power cord is securely plugged into a working outlet. Check your circuit breaker or fuse box to ensure the outlet has power. Confirm the air fryer basket is fully inserted; a safety mechanism prevents operation when not properly locked.

Inspect for any error codes displayed on the unit – refer to the “Troubleshooting: Error Codes” section for specific meanings. Ensure the timer is set and the power button is engaged. If the issue persists, try resetting the appliance by unplugging it for several minutes, then plugging it back in.

If none of these steps resolve the problem, contact customer support.

Troubleshooting: Food Not Crispy

If your food isn’t getting crispy in your Cooks Essentials air fryer, overcrowding the basket is a common cause. Ensure food is arranged in a single layer with space for air circulation. Lightly coat food with oil – a small amount aids in browning and crisping.

Verify the cooking temperature is appropriate for the food type; higher temperatures generally promote crispiness. Extend the cooking time slightly, checking frequently to avoid burning. For frozen foods, ensure they aren’t heavily frosted before air frying.

Consider preheating the air fryer for a few minutes before adding food. Maximizing air circulation is key; avoid covering the basket completely.

Troubleshooting: Error Codes

If your Cooks Essentials air fryer displays an error code, consult this guide for potential solutions. While specific codes vary by model, a common error indicates a temperature sensor malfunction – unplug the unit, allow it to cool, and retry. Another code might signal a heating element issue, requiring professional service.

An “E1” or similar code often relates to improper basket placement; ensure it’s securely inserted. If the unit repeatedly displays an error after troubleshooting, do not attempt self-repair.

Refer to the complete error code list in the full manual (available online) or contact Cooks Essentials customer support for assistance. Never operate the air fryer with an active error code.

Advanced Features & Tips

Maximize your Cooks Essentials air fryer experience with these advanced techniques! For even cooking, avoid overcrowding the basket – work in batches. Regularly shake or flip food halfway through the cooking cycle to ensure consistent crisping.

Consider utilizing compatible accessories, such as skewers or baking pans (sold separately), to expand your recipe options. To promote optimal air circulation, ensure food isn’t pressed tightly together.

Experiment with marinades and seasonings; the air fryer intensifies flavors. Remember to lightly oil food for enhanced browning and crispiness. Explore online resources for innovative air fryer recipes and techniques!

Using Accessories (if applicable)

Enhance your Cooks Essentials air fryer’s versatility with optional accessories! Skewers are perfect for kebabs and smaller food items, promoting even cooking. Baking pans allow for cake and casserole preparation directly within the unit. Specialized racks can elevate food, improving air circulation and crisping underneath.

Always ensure accessories are air fryer-safe and fit properly within the basket. Avoid using metallic accessories that could damage the non-stick coating. When using baking pans, reduce cooking temperature slightly to prevent burning.

Refer to accessory-specific instructions for optimal use and cleaning. Regularly inspect accessories for wear and tear, replacing them as needed. Explore available accessory bundles for cost-effective expansion of your air frying capabilities!

Maximizing Air Circulation for Even Cooking

Achieving consistently crispy and evenly cooked results with your Cooks Essentials air fryer relies on optimal air circulation. Avoid overcrowding the basket; food needs space for air to flow around each piece. For best results, cook in batches if necessary.

Shake or flip food halfway through the cooking process to ensure all sides are exposed to the hot air. This is particularly important for smaller items like fries or nuggets. Don’t cover the food entirely with sauce or marinade before air frying, as this can hinder crisping.

Ensure the air vents on the top and back of the unit remain unobstructed during operation. Proper ventilation is crucial for efficient air flow and consistent cooking performance.

Warranty Information

Your Cooks Essentials Air Fryer is warranted against defects in materials and workmanship for a period of one (1) year from the date of original purchase. This warranty covers normal household use and does not cover damage resulting from misuse, abuse, accidents, or unauthorized modifications.

To make a warranty claim, please retain your proof of purchase and contact Cooks Essentials Customer Support (see contact details below). We will, at our discretion, repair or replace the defective product. This warranty gives you specific legal rights, and you may have other rights which vary by jurisdiction.

This warranty does not cover incidental or consequential damages. Any implied warranties, including merchantability and fitness for a particular purpose, are limited in duration to the warranty period.

Contacting Customer Support

For assistance with your Cooks Essentials Air Fryer, or if you have any questions regarding its operation, maintenance, or warranty, please do not hesitate to contact our dedicated Customer Support team. We are committed to providing prompt and helpful assistance to ensure your satisfaction.

You can reach us via the following methods:

  • Phone: 1-800-XXX-XXXX (available Monday-Friday, 9 AM ⎻ 5 PM EST)
  • Email: support@cooksentials.com
  • Website: www.cooksentials.com/support (access FAQs and submit a support ticket)

Please have your model number and proof of purchase readily available when contacting us. Our team is equipped to address troubleshooting, warranty claims, and general inquiries.

beats solo 3 instruction manual

Beats Solo 3 Instruction Manual: A Comprehensive Guide

Welcome to the definitive guide for your Beats Solo 3 headphones! This manual provides detailed instructions, troubleshooting tips, and essential safety information for optimal use․

Discover how to pair, control, and maintain your device, ensuring a premium listening experience․ Explore warranty details and customer support options for peace of mind․

Beats Solo 3 Wireless Headphones deliver premium sound quality and a comfortable listening experience․ These headphones are designed for those who demand exceptional audio performance and seamless connectivity․ Featuring Apple’s W1 chip, pairing with Apple devices is incredibly simple and reliable, offering extended range and improved battery life․

The Solo 3 boasts up to 40 hours of battery life, allowing for extended listening sessions without interruption․ With Fast Fuel charging, a quick 5-minute charge provides up to 3 hours of playback․ These on-ear headphones combine sleek aesthetics with robust functionality, making them ideal for everyday use, travel, or workouts․ This manual will guide you through every aspect of your Beats Solo 3, ensuring you maximize its potential․

What’s in the Box?

Upon opening your Beats Solo 3 package, you should find the following items carefully included․ First, the Beats Solo 3 Wireless On-Ear Headphones themselves, showcasing a sleek and modern design․ You’ll also receive a carrying case, designed to protect your headphones during travel and storage․

A USB Remote Cable is provided for charging and wired audio connectivity․ This cable allows you to enjoy your music even when the battery is low or with devices lacking Bluetooth capabilities․ Additionally, a Quick Start Guide is included to help you quickly set up and begin using your new headphones․ Finally, you’ll find a warranty card detailing the coverage for your Beats Solo 3․

Charging Your Beats Solo 3

To charge your Beats Solo 3 headphones, connect the included USB Remote Cable to a USB power source and the Micro-USB port on the right earcup․ A full charge typically takes around 2 hours, providing up to 40 hours of playback․ Initial Charging is recommended before first use to ensure optimal battery performance․

While charging, the Charging Indicator Lights will illuminate․ A pulsing white light indicates charging is in progress․ Once fully charged, the light will turn solid white․ It’s important to use a reliable USB power adapter to avoid damaging the battery․ Avoid extreme temperatures during charging for longevity․

Initial Charging

Before enjoying your new Beats Solo 3 headphones, a complete initial charge is highly recommended․ This ensures the battery is fully calibrated for accurate performance and maximizes its lifespan․ Connect the provided USB Remote Cable to a powered USB port and the headphone’s Micro-USB port․

During this first charge, allow the headphones to charge for a full 2 hours, even if the indicator light appears to show a full charge sooner․ This complete cycle optimizes battery health․ Disconnect once fully charged and enjoy up to 40 hours of wireless listening!

Charging Indicator Lights

The LED indicator lights on your Beats Solo 3 provide crucial information about the charging status and battery level․ While charging, a red light indicates the battery is currently being charged․ Once fully charged, the light will turn green, signaling readiness for use;

If the light flashes red, it suggests a low battery level․ A quick 5-minute charge can provide approximately 3 hours of playback․ Remember to always use the provided USB cable for optimal charging and to avoid potential compatibility issues with third-party chargers․

Powering On and Off

To power on your Beats Solo 3 headphones, simply press and hold the power button located on the right ear cup for approximately one second․ You’ll hear an audio tone confirming the power-on status, and the LED indicator will illuminate․

To power off the headphones, press and hold the same power button for three seconds․ An audio tone will indicate the power-off sequence, and the LED will turn off․ When powered off, the headphones conserve battery life, preventing accidental usage and ensuring longevity․ Remember to fully power down when storing for extended periods․

Bluetooth Pairing

Establishing a Bluetooth connection with your Beats Solo 3 is straightforward․ Ensure your headphones are powered on․ To initiate pairing mode, press and hold the power button for three seconds until the LED indicator begins to flash white․

Next, navigate to the Bluetooth settings on your smartphone, tablet, or computer․ Select “Solo3” from the list of available devices․ If prompted, enter the pairing code “0000”․ Once connected, a confirmation tone will play, and the LED will turn solid white․ Enjoy seamless wireless audio!

Pairing with a New Device

To connect your Beats Solo 3 to a device it hasn’t been paired with before, begin by ensuring the headphones are fully charged and powered off․ Press and hold the power button located on the right ear cup for approximately three seconds․

Watch for the LED indicator to start flashing white, signifying it’s in pairing mode․ On your new device, access the Bluetooth settings and scan for available devices․ Select “Solo3” when it appears in the list․ If a passcode is requested, enter “0000”․ Successful pairing is confirmed by a solid white LED and an audio prompt․

Re-Pairing with a Previously Connected Device

If your Beats Solo 3 were previously connected to a device but have become disconnected, the re-pairing process is straightforward․ First, ensure the headphones are powered on․ If they don’t automatically connect, put them into pairing mode․

To do this, hold the power button for three seconds until the LED begins to blink white․ On your device, navigate to the Bluetooth settings․ Select “Solo3” from the list of available devices․ The headphones should reconnect automatically․ If prompted, confirm the pairing request․ A solid white LED indicates a successful reconnection․

Controls and Functions

Beats Solo 3 offers intuitive controls for seamless operation․ The ‘b’ button on the left ear cup activates Siri or your device’s default voice assistant, allowing hands-free control․ Volume adjustment is managed via the volume buttons located on the right ear cup – press ‘+’ to increase and ‘-’ to decrease․

Playback control is also on the right: a single press plays/pauses music, while double-pressing skips to the next track․ Answering and ending calls is simple; a single press answers an incoming call and ends a current one․ These controls provide convenient access to essential functions․

Volume Control

Adjusting the volume on your Beats Solo 3 is straightforward and easily accessible․ Located on the right ear cup, you’ll find dedicated volume buttons clearly marked with ‘+’ and ‘-’ symbols․ A simple press of the ‘+’ button increases the audio output, making your music louder․

Conversely, pressing the ‘-’ button decreases the volume, allowing you to lower the sound․ These buttons offer precise control, enabling you to find the perfect listening level for any environment․ Quick adjustments are possible without needing to access your paired device’s volume settings․

Playback Control (Play/Pause, Skip)

Managing your music with the Beats Solo 3 is intuitive and convenient․ The multi-function button, situated on the right ear cup, handles play/pause and track skipping․ A single press will play or pause your current audio track, offering instant control over your listening experience․

To skip to the next track, briefly press the multi-function button twice․ To return to the previous track, press it three times quickly․ These controls eliminate the need to constantly reach for your paired device, providing seamless music management while on the go․

Answering and Ending Calls

Seamless call management is a key feature of the Beats Solo 3․ When you receive an incoming call, a single press of the multi-function button on the right ear cup will answer it․ Enjoy clear, hands-free conversations without needing to remove your headphones․

To end a call, simply press the multi-function button once again․ If you prefer to reject an incoming call, a longer press of the button will send it directly to voicemail․ These simple controls ensure you stay connected and in control, even while enjoying your favorite music or podcasts․

Using Siri or Voice Assistant

Activate your voice assistant effortlessly with Beats Solo 3․ To summon Siri on your Apple devices, or the default voice assistant on Android, simply press and hold the ‘b’ button located on the left ear cup․ This initiates the voice assistant, allowing you to make requests hands-free․

You can then use voice commands to control music playback, make calls, send messages, get directions, and much more․ Ensure your device is paired and connected for optimal performance․ Enjoy the convenience of voice control while staying immersed in your audio experience․

Troubleshooting Common Issues

Experiencing issues with your Beats Solo 3? Let’s address common problems․ If your headphones have no power, ensure they are adequately charged․ If charging doesn’t resolve the issue, try a different charging cable or adapter․ For Bluetooth connection problems, verify Bluetooth is enabled on your device․

Attempt re-pairing the headphones․ If problems persist, reset your Solo 3 by holding the power and volume down buttons simultaneously․ Consult the full manual for detailed steps․ If issues continue, contact Beats support for further assistance and potential warranty claims․

No Power

If your Beats Solo 3 won’t turn on, the first step is to confirm sufficient charge․ Connect the headphones to a power source using the provided USB cable․ Allow them to charge for at least 30 minutes, even if the indicator lights don’t immediately illuminate․

Try a different USB port or wall adapter to rule out a faulty power source․ If charging still fails, inspect the charging cable for damage․ A damaged cable can prevent power transfer․ If none of these steps work, contact Beats support for further assistance, as it may indicate an internal issue․

Bluetooth Connection Problems

Experiencing Bluetooth connectivity issues? First, ensure your Beats Solo 3 are in pairing mode – hold the power button for 3 seconds until the LED flashes․ Verify Bluetooth is enabled on your device and that the headphones aren’t already connected to another source․

If previously paired, try “forgetting” the device in your Bluetooth settings and re-pairing․ Move closer to your device to minimize interference․ Restarting both your headphones and the connecting device can often resolve connection glitches․ If problems persist, reset your Solo 3 to factory settings․

Warranty Information

Your Beats Solo 3 headphones are covered by a limited warranty against defects in materials and workmanship․ This warranty typically lasts for one year from the date of original purchase, but may vary by region․

The warranty covers manufacturing issues, not normal wear and tear, accidental damage, or misuse․ Proof of purchase is required for all warranty claims․ To initiate a claim, visit the official Beats by Dre support website or contact customer service․ Unauthorized repairs void the warranty․ See the full warranty details online for complete terms and conditions․

Safety Precautions

To ensure safe usage of your Beats Solo 3 headphones, please heed these important precautions․ Avoid using the headphones at high volumes for extended periods to prevent hearing damage․ Do not use the headphones while operating a vehicle or machinery․

Keep the headphones and accessories away from water and extreme temperatures․ Do not disassemble or attempt to repair the headphones yourself, as this will void the warranty and may cause injury․ If you experience discomfort or irritation, discontinue use immediately․ Store the headphones in a safe, dry place when not in use․

Cleaning and Maintenance

To maintain the pristine condition and longevity of your Beats Solo 3 headphones, follow these simple cleaning and maintenance guidelines․ Regularly wipe down the earcups and headband with a soft, dry cloth to remove dust and debris․ For stubborn marks, lightly dampen the cloth with water and mild soap․

Avoid using abrasive cleaners or solvents, as they may damage the surface․ Inspect the cable for any signs of wear or damage, and replace it if necessary․ Store your headphones in a clean, dry place when not in use, preferably in the included carrying case․

Technical Specifications

Here’s a detailed overview of the technical specifications for your Beats Solo 3 Wireless Headphones․ These headphones feature Apple’s W1 chip for seamless connectivity and efficient battery performance․ They boast a 40mm driver delivering a dynamic and immersive sound experience․

Bluetooth connectivity utilizes Class 1 Bluetooth technology, offering a wireless range of up to 30 feet (10 meters)․ Battery life provides up to 40 hours of playback with ANC off, and up to 22 hours with ANC on․ Charging time is approximately 2․5 hours for a full charge, with a 5-minute charge providing 3 hours of playback․

Resetting Your Beats Solo 3

Occasionally, resetting your Beats Solo 3 can resolve connectivity or performance issues․ To perform a factory reset, first ensure your headphones are powered on․ Then, simultaneously press and hold the volume up and volume down buttons for approximately 10 seconds․

The LED indicator will flash, signifying the reset process has begun․ Continue holding the buttons until the LED rapidly flashes white, then turns off․ Your Beats Solo 3 will now return to its factory settings, erasing all paired device information․ You can then re-pair with your preferred devices as needed․

Regulatory Information

This device complies with Part 15 of the FCC Rules․ Operation is subject to the following two conditions: (1) This device may not cause harmful interference, and (2) this device must accept any interference received, including interference that may cause undesired operation․

Changes or modifications not expressly approved by the party responsible for compliance could void the user’s authority to operate the equipment․ This product may also be subject to regulations in other regions; please consult local authorities for specific requirements․ Further details regarding compliance can be found on the Apple support website․

Customer Support Contact Details

For dedicated assistance with your Beats Solo 3 headphones, please visit the official Apple Support website at support․apple․com․ Here, you’ll find a comprehensive knowledge base, troubleshooting guides, and FAQs addressing common issues․

Alternatively, you can connect with a support advisor via online chat or schedule a call․ For warranty claims or more complex technical problems, direct contact through Apple Support is recommended․ You can also find helpful community forums where users share solutions and experiences․ Ensure your serial number is available when contacting support․